In the world of computer installations and operating systems, the error message “Windows Cannot Be Installed to This Disk GPT” can be a common stumbling block. If you’ve encountered this error while trying to install Windows, you’re not alone.
This comprehensive guide aims to demystify the error, explain its meaning, delve into its causes, and provide solutions to help you resolve it.
Demystifying the “Windows Cannot Be Installed to This Disk GPT” Error
Before we dive into the causes and solutions, let’s clarify what this error actually means. When you see the message “Windows Cannot Be Installed to This Disk GPT,” it implies that there’s an issue with the partition style of the target drive.
GPT stands for GUID Partition Table, which is a modern partitioning scheme used on many computers today. This error suggests that the selected drive may have a partition style incompatible with the Windows version you’re trying to install.
The GPT Disk Is Unreadable, So Windows Can’t Be Installed There.
Because your computer was built to be set up in Basic Input/Output System (BIOS) mode, you may receive the error message “The selected disc has a GPT partition style.” However, the disc on which you are attempting to instal Windows is partitioned in GPT, a partitioning scheme supported by the Unified Extensible Firmware Interface.
Converting the disc from a GUID Partition Table (GPT) to a Master Boot Record (MBR) is the only solution. Following is what you need to do:
- Launch Command Prompt when you get the message “The selected disc has a GPT partition style.”
- Press Enter after typing “diskpart” to execute the command.
- Once you’ve typed “list disc” press Enter again.
- Simply enter “select disc #” and hit Enter. You must change “#” to the disc number in the GPT partition format.
- Simply enter “clean,” followed by “convert mbr,” and then click Enter.
Read Also:
- Clear Windows Update Cache
- Windows Photo Viewer Not Enough Memory
- How To Remove Write Protection From USB Drive in Windows 10
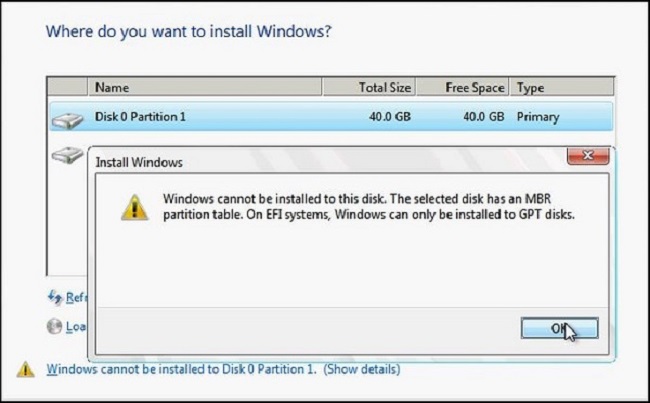
The MBR of This Disk Does Not Support Installing Windows.
When installing Windows 10, 8, or 7, many people get the message “The selected drive is of the MBR partition style.” That message appears if your hard drive isn’t ready for UEFI installation of Windows.
The selected disc is partitioned using GPT rather than the more common MBR format. The good news is that you can modify the UEFI boot configuration in BIOS. How? Read on!
- To enter BIOS mode, you must restart the computer. It’s important to remember that “Delete + F10” is just the usual shortcut and the actual steps may differ per manufacturer.
- Select the DVD drive’s boot order in BIOS’s “Boot Devices” menu to switch it from UEFI to Legacy Mode.
- If you’ve made any changes in BIOS, save them before leaving the programme.
- First, restart your computer and then attempt installing Windows again.
This SSD Disk Does Not Support the Windows Operating System.
Transferring Windows to a new Solid State Drive (SSD) is guaranteed to increase boot time and overall performance.
There is a chance, though, that the computer’s BIOS or Windows installation won’t find the SSD. First, make sure that the SSD’s cables are properly connected.
A serial advanced technology attachment (SATA) cable is required for SSD, and it may need to be replaced. Manually entering BIOS mode and inspecting the controller and drive data will tell you if the SATA port is active.
If the issue persists, though, you’ll need to resort to the computer’s Command Prompt utility. How? Read on!
- Search for “Command Prompt” on Windows’s top menu bar to open it.
- To use the disc partitioning utility, press the Diskpart> key and then press Enter.
- Instead of “list disc,” use the disk’s number, then hit Enter.
- Press Enter once again after typing “clear all.”
- When the “exit” key is used, the Command Prompt window is closed.
- Open Windows Setup again.
As this procedure would erase anything on the SSD, you should make sure you have a backup copy of anything of value on there beforehand.
This Disc May Soon Fail, So Windows Cannot Be Installed on it.
Reinstalling Windows 10 or 11 to fix performance issues, instal a security patch, or remove malware can result in a mysterious error.
You may get a message saying “The Windows cannot be installed to this disc” if you try to instal it on a different drive. The disc could crash at any time. There is a workaround for the error that suggests using a different drive to instal Windows.
The CHKDSK (check disc) Windows software can be used to troubleshoot this issue. Errors would be detected and fixed as planned. Easy to follow instructions are as follows:
- To run a system check, type “CHKDSK” into your computer’s search box.
- Select “Run as Administrator” from the context menu after right-clicking the results.
Just open Command Prompt and type “CHKDSK” to run the same check.
This NTFS Disk Does Not Support the Windows Installer.
Windows must be installed on an NTFS partition” error message when attempting to instal Windows to a non-NTFS drive. This indicates that your boot partition is not properly configured, and you may need to switch to using NTFS for your files.
DiskPart management is the best option for fixing partition type difficulties and many other problems. Here, those measures are as follows:
- To use diskpart, launch the Command Prompt and enter the command.
- Simply enter the disc number, followed by “choose partition,” “list partition,” and another Enter.
- Enter “select partition #” and continue typing.
- Start the file system conversion by typing “format fs=ntfs fast” and hitting the Enter key.
There Was An Error Installing Windows To This Disc (0x803).
When upgrading to a newer version of Windows, many customers receive the “Error 0x80300024” message. Once again, this error message points to a problem with the partition style or volume.
However, before you upgrade Windows, you should make sure your machine meets the system requirements. There are alternative approaches you can take if that isn’t an option. An additional hard disc connected to your computer may be the source of this problem.
Remove these because they may be causing problems with the Windows installation. Another possible cause is that you used a USB installation method when upgrading to Windows. In order to rule out a single USB port as the culprit, you need try all of them.
Lastly, there is the possibility that the Windows installation is being blocked by corrupted data on the hard drive partition. The only way around this is to reformat the drive and try installing Windows again.
It’s not difficult to do, but before you start, make sure you have a copy of everything on the disc you don’t want to lose. Here’s what you need to do if you want to delete everything and start over, or if you just want to back up what you have.
- Select the disc on which Windows will be installed, and then select Properties from the menu that appears.
- You can format your selection by clicking the “Format” button.
- After the disc has been formatted, you can continue installing Windows by clicking the “Next” button.
Potential Causes of the “Windows Cannot Be Installed to This Disk GPT” Error
- Mismatched Partition Style: The most common cause is a mismatch between the partition style of the target drive and the installation method. For instance, trying to install a 64-bit version of Windows on a GPT-partitioned drive while booting in Legacy BIOS mode can trigger this error.
- UEFI vs. Legacy BIOS: Windows installations can be initiated in either UEFI (Unified Extensible Firmware Interface) mode or Legacy BIOS (Basic Input/Output System) mode. Using the wrong mode for your drive’s partition style can lead to the error.
- Drive Already Contains Data: If the drive you’re attempting to install Windows on already contains data or partitions, it may need to be formatted or modified to match the installation requirements.
- Third-Party Disk Management Tools: Sometimes, third-party disk management tools or utilities used on the drive can interfere with the installation process.
Solutions to Resolve the “Windows Cannot Be Installed to This Disk GPT” Error
Now that we’ve identified potential causes, let’s explore solutions to overcome this error:
1. Check Boot Mode:
- Ensure that your computer is set to boot in the correct mode (UEFI or Legacy BIOS) that matches the installation method. Adjust the boot mode in your computer’s BIOS or UEFI settings.
2. Prepare Bootable Media:
- Create a bootable USB drive or DVD that matches the desired installation mode (UEFI or Legacy BIOS). You can use tools like Rufus or the Windows Media Creation Tool to create a bootable device.
3. Backup Data:
- If the target drive already contains important data, back it up to an external storage device or cloud service. Formatting or modifying the drive during installation will erase existing data.
4. Change Partition Style:
- If the error persists, you may need to convert the drive’s partition style to match your desired installation mode. Be cautious, as this process involves data loss.
- To convert a drive from GPT to MBR (Master Boot Record), you can use disk management tools like DiskPart or third-party partitioning software.
5. Clear Drive Data:
- During the Windows installation process, you can choose to delete all existing partitions on the target drive. This will allow Windows to create new partitions with the correct style.
6. Use Windows Installation Wizard:
- Follow the Windows installation wizard carefully, as it will guide you through partitioning and formatting options. Ensure that you select the correct drive and partition style during installation.
7. Update Firmware/BIOS:
- Ensure that your computer’s firmware or BIOS is up-to-date. Manufacturers often release updates that can resolve compatibility issues.
8. Avoid Third-Party Tools:
- If you’ve used third-party disk management tools on the target drive, consider reverting it to its original state using Windows tools before attempting the installation.
Read Also:
- How To Enter Bios Windows 11
- Host Process For Windows Services
- This NVIDIA Graphics Driver is Not Compatible With This Version of Windows
Conclusion
The “Windows Cannot Be Installed to This Disk GPT” error may seem daunting, but with the right approach, it can be overcome. By understanding the potential causes and following the appropriate solutions, you can successfully install Windows on your desired drive without encountering this error.
Always take precautions to back up important data before making any significant changes to your disk partitions. With patience and attention to detail, you can navigate this error and have your Windows operating system up and running smoothly.


