Omegle is a popular online chat platform that connects users with strangers around the world for text, voice, and video chats. Enabling your camera on Omegle allows for a more engaging interaction.
However, users often encounter challenges when trying to activate their cameras on different devices, including Apple and Android smartphones and laptops.
This guide will walk you through the process of enabling your camera on Omegle across various devices and provide solutions for common issues.
Enabling Camera on Omegle for Apple Devices (iPhone and iPad)
To use your camera for video chats on Omegle using an Apple device, follow these steps:
Step 1: Grant Camera Permissions
- Go to Settings: Open your device’s settings app.
- Privacy Settings: Navigate to the ‘Privacy’ section and select ‘Camera’.
- Allow Camera Access for Browsers: Toggle on the switch next to the browser you use for Omegle (e.g., Safari, Chrome) to allow camera access.
Step 2: Access Omegle
- Open your preferred browser and go to the Omegle website. Ensure you’re using a browser that supports video functionalities, like Safari or Chrome.
Step 3: Start a Video Chat
- On the Omegle home page, select the ‘Video’ chat option. The browser may prompt you to allow camera access if it hasn’t been granted already. Confirm the access to start your video chat.
Enabling Camera on Omegle for Android Devices
Using Omegle on an Android device requires similar steps to those on Apple:
Step 1: Grant Camera Permissions
- Go to Settings: Access your device settings.
- Apps & Notifications: Find and select the browser app you use for Omegle.
- Permissions: In the app settings, go to ‘Permissions’, then tap on ‘Camera’ and switch it to ‘Allow’.
Step 2: Visit Omegle
- Open your preferred web browser and navigate to the Omegle website.
Step 3: Start a Video Chat
- Choose the ‘Video’ chat mode on Omegle. You’ll need to allow the camera access from the browser’s prompt to proceed with video chatting.
Enabling Camera on Omegle for Laptops (Windows and macOS)
Laptop users can also enjoy video chatting on Omegle, whether they’re using Windows or macOS:
Step 1: Check Browser Permissions
- Access Browser Settings: In browsers like Chrome or Firefox, go to the settings menu.
- Privacy and Security: Navigate to ‘Privacy and Security’ and then ‘Site Settings’ or ‘Permissions’.
- Camera: Find the ‘Camera’ settings and ensure your browser is set to ‘Ask before accessing’ (recommended). Also, make sure no sites are blocked from accessing the camera.
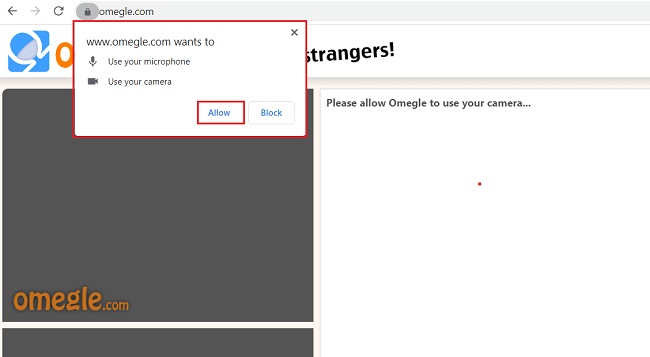
Step 2: Open Omegle and Configure Settings
- Go to Omegle’s website and before starting a video chat, click the camera icon in the URL bar to check if the camera access is allowed for Omegle. If it’s blocked, change it to ‘Allow’.
Step 3: Start Video Chat
- Select ‘Video’ on the Omegle home page, and you should be able to start a video chat. Confirm any prompts that request camera access.
Using CMD and Shortcuts to Enable Camera on Omegle
For Windows Users:
- Command Prompt (CMD) is not typically used for enabling a camera directly in web applications like Omegle. Camera access largely depends on browser and system permissions.
- Shortcut: You can ensure that your device drivers, especially camera drivers, are up to date by using the Device Manager. Access it by pressing
Win + Xand selecting ‘Device Manager’, where you can update your camera drivers if needed.
For macOS:
- Terminal Commands: Like CMD, the terminal in macOS isn’t used to enable the camera for web applications. Focus on system preferences and browser settings to manage camera permissions.
- Shortcut: Ensure that your macOS is up-to-date by checking the ‘System Preferences’ > ‘Software Update’ to maintain camera compatibility.
Advanced Troubleshooting Techniques
Check Browser Compatibility:
Not all web browsers handle online video chatting services like Omegle equally. If you experience issues with one browser, try another.
For instance, if you’re using an older version of Internet Explorer, you might face compatibility issues; switching to a newer browser like Google Chrome or Mozilla Firefox might resolve these problems.
Disable Conflicting Extensions:
Browser extensions can interfere with web applications like Omegle. If you suspect this might be the case:
- Disable all browser extensions.
- Restart the browser.
- Try accessing Omegle again to see if the problem persists.
- Re-enable extensions one by one to identify any that may cause conflicts.
Update Webcam Drivers:
On laptops, outdated webcam drivers can cause issues with video feeds.
- Windows: Go to ‘Device Manager’, find your webcam under ‘Cameras’ or ‘Imaging devices’, right-click and choose ‘Update driver’.
- Mac: macOS generally handles drivers automatically, but ensure your system is updated.
Adjust Camera Privacy Settings:
- Windows 10/11: Go to ‘Settings’ > ‘Privacy’ > ‘Camera’. Make sure camera access is allowed for your device and applications.
- Mac: Go to ‘System Preferences’ > ‘Security & Privacy’ > ‘Camera’. Ensure your browser is checked to allow camera access.
Ensuring Privacy and Security on Omegle
When enabling your camera on platforms like Omegle, it’s important to consider privacy and security:
- Cover Your Webcam When Not in Use: This prevents any unwanted access to your webcam by malicious software.
- Be Cautious of Personal Information: Be mindful of what’s visible in your camera frame. Avoid showing sensitive personal items or information.
- Use Secure Networks: Avoid using public Wi-Fi networks when video chatting on Omegle, as they can be less secure.
User Experience Tips
Optimize Lighting and Background:
Good lighting can significantly enhance the video quality. Make sure your face is well-lit from the front. Also, consider what’s behind you—a neutral background is typically best.
Use Headphones:
To avoid feedback and ensure privacy, use headphones during your video chat.
Test Your Setup:
Before going live on Omegle, test your webcam setup with another app like the camera app available in Windows or Photo Booth in macOS. This can help you confirm that everything is working correctly.
Conclusion
Whether you’re using an Apple, Android device, or a laptop, enabling your camera on Omegle requires correct settings in both your device and the browser.
By following the steps outlined above, you can troubleshoot common camera issues and enhance your Omegle experience with live video chats.
Always ensure your browser and operating system are up-to-date to avoid compatibility issues and safeguard your privacy by managing camera permissions wisely.
FAQ: Enabling and Troubleshooting Camera on Omegle
Q1: How do I enable my camera on Omegle for an iPhone?
A1: To enable your camera on Omegle for an iPhone, go to Settings > Privacy > Camera. Ensure your browser (such as Safari or Chrome) is allowed to access the camera. Then, visit Omegle, choose video chat, and allow camera access when prompted by your browser.
Q2: What should I do if my camera isn’t working on Omegle on my Android device?
A2: Check to ensure that camera permissions are granted in your device settings. Go to Settings > Apps & Notifications > [Your Browser] > Permissions > Camera, and make sure it’s set to ‘Allow’. If issues persist, try clearing the browser cache or restarting your device.
Q3: Why can’t I enable my camera on Omegle on my laptop?
A3: Ensure that the browser has permission to use the camera. In your browser settings under Privacy and Security, find Camera settings and check if Omegle is allowed to access your camera. Also, check your operating system’s privacy settings to ensure the camera is enabled for use by apps.
Q4: How can I update my camera drivers to fix Omegle issues on a laptop?
A4: On Windows, open Device Manager, expand ‘Cameras’ or ‘Imaging devices’, right-click your webcam, and select ‘Update driver’. For Mac users, macOS typically updates drivers automatically, but make sure your system is up to date by checking in System Preferences > Software Update.
Q5: How do I restart my camera on Omegle if it freezes during a chat?
A5: If your camera freezes during a chat, try refreshing the Omegle page or restarting your browser. Additionally, disconnecting and reconnecting the webcam can help if you are using an external camera.
Q6: Can I use CMD to troubleshoot camera issues on Omegle?
A6: While CMD can’t directly fix camera issues on Omegle, it can be used to renew your IP address or flush DNS which might help resolve underlying network issues. To do so, open CMD as an administrator, type ipconfig /release, then ipconfig /renew, and ipconfig /flushdns.
Q7: What is the shortcut to quickly enable/disable the camera on a laptop?
A7: Most laptops do not have a direct keyboard shortcut to enable/disable the camera. However, you can often disable or enable the camera quickly through device manager on Windows or system preferences on macOS.
Q8: How do I ensure my privacy while using the camera on Omegle?
A8: Cover your camera when not in use, be mindful of your surroundings and what’s visible in your video frame, use secure networks for internet connection, and consider using virtual backgrounds if your software supports it.
Q9: What are the best browsers to use for Omegle video chats?
A9: Google Chrome and Mozilla Firefox are generally the best browsers for Omegle video chats as they frequently update and support the latest web technologies. Make sure your browser is up-to-date for the best performance.
Q10: Can antivirus software affect camera functionality on Omegle?
A10: Yes, some antivirus programs can block your camera if they detect suspicious activity. Check your antivirus settings and add an exception for your browser if necessary to ensure it doesn’t block your camera.
These FAQs cover a broad spectrum of common issues and solutions for enabling and troubleshooting camera functionality on Omegle across various devices, helping you to enjoy a smoother and more secure video chat experience.


