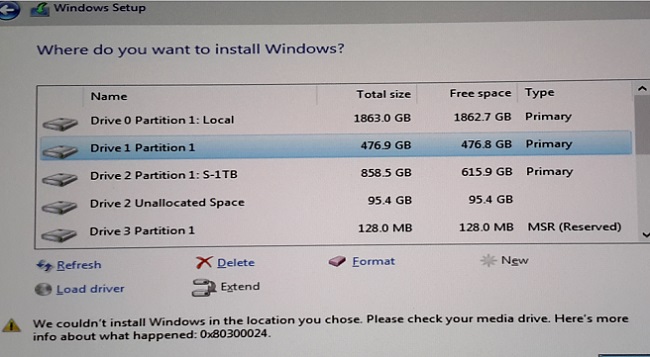
The error code 0x80300024 is one of the error codes that people often encounter while you install new version of the Windows operating system on your PC. Any such sort of error is often escorted by message stating the details of the that particular error.
The error code 0x80300024 is escorted by the message “Windows is unable to install to the selected location”.
There might be several reasons behind this error to occur indicating software or hardware issue, something related to the location of the hard disk partition where the update needs to be stored, insufficient destination drive space, corrupted installation media or corrupted hard drive.
Moreover, it is not just restricted to single iteration of Windows but you will find it in Windows 7 as well as Windows 10. It is sure that every catch has fix and thus, this error is not an exception.
Understanding Error Code 0x80300024
Error code 0x80300024 is a common occurrence when installing or reinstalling Windows operating systems on a computer.
It typically appears during the initial phase of the installation process when you are prompted to select a disk or partition where Windows will be installed.
The error message often reads something like “Windows is unable to install to the selected location” or “Windows cannot be installed to this disk.”
Read Also:
Common Scenarios Where Error 0x80300024 May Occur:
- Clean Installation: You encounter this error when attempting to perform a clean installation of Windows on a new or existing hard drive or SSD.
- Dual Boot Configuration: If you are trying to set up a dual-boot system with multiple operating systems on the same disk, you may encounter this error.
6 Solutions to the Error 0x80300024
Here we have mentioned a list of 6 best solutions to fix the error code 0×80300024. So let’s have a look on them.
Solution 1: Remove any Unnecessary Hard Drives
In case you have more than one hard-drives connected to your PC, say you are trying to install the update in one hard drive then there are chances that some other hard drive connected your PC might interfere with the installation process.
Hence you might encounter the error ox80300024 because of this glitch. In order to avoid such type of case it is advisable to remove any unnecessary extra hard drive where you don’t wish to install the update.
Once done retry installing the update again and check if the error is fixed, if not try with the following solutions.
Solution 2: Try Plugging the Installation Media into Different USB Port
Many people often try installing the update through the USB port with appropriate installation media on it. Thus, there is a possibility that the issue is with the USB port in which the installation media is plugged in,
So try installing the Windows update with the USB having particular installation media into a different USB port, say switch from the USB port 3.0 to USB port 2.0 or reverse the process. Now check whether you can successfully install the update.
Solution 3: Make sure that the Target Drive is at the Top of the Computer’s Boot Order
If you have more than one hard drives and the hard drive where you are trying to install the update is not at the top of the boot order then there are chances that the update must be assorting some other hard drive.
This may cause problem as the hard drive where the update is seeking for installation might not be satisfying the demands and space of the update that need to be installed.
Hence the hard drive which you want the update to be installed should be kept at the top of the booting order that is you have to adjust the disc order in the BIOS of your PC during start-up. Follow the steps given below to change the settings.
Step 1: Boot your computer.
Step 2: In order to access the BIOS set-up of your PC you need to press the F1, F2 or Del key to complete this process. (the key for accessing the BIOS window varies from brand to brand and hence you need to consult your PC brand manual to know the key).
Step 3: Once you are into the BIOS set-up, navigate for the boot configuration of your PC.
Step 4: Change the hard disk order as per your preference giving the hard disc you want to install the update in the primary booting position.
Step 5: Also, in the ‘boot’ section of the BIOS check whether you have selected “UEFI” as the boot mode.
Step 6: Save the changes you have made and egress the BIOS set-up window.
Step 7: Format the installation location:
If the hard disk partition where you are willing to install the update in is not freshly created partition then some of the data that already exist on that partition might interfere with the new update and can cause hurdles in installing it.
It is therefore recommended that you must format the location where you wish to install the update. If it is data previously existing there causing error then resorting to format disk can help.
Step 1: In case, you do not have Windows installation media ready, you are going to have to create one and if you already have it installed in your PC just insert the bootable Windows installation media into your PC and restart it.
Step 2: Once your computer restarts, choose to boot from the inserted installation media.
Step 3: Configure your language, keyboard layout, and other preferences.
Step 4: Click on Custom when it is asked for the type of Windows installation you wish to have.
Step 5: Then click on the Drive options (advanced) when asked the position where you want to install Windows update.
Step 6: Then select the partition of the hard drive where you wish to install Windows on and click on Format.
Step 7: Confirm your action and wait until the drive completes it formatting procedure.
Step 8: Then click on next to carry on with the installation.
Step 9: If this doesn’t work then select the drive and click on delete instead of format.
Step 10: This will convert the hard drive into a unallocated partition and you can use it again later.
Step 11: Create the partition again and install Windows on it.
Step 12: If the error still remains unresolved, click on “Delete” again and let it stay as unallocated space.
Step 13: Boot from the installation media and select this unallocated space to install Windows.
Solution 5: Replace your hard drive:
If you have resorted for all the above solutions but still didn’t find a fix to your problem then it is time to change your hard disk. The one installed might cause issue because of some faults in it. Hence it is best to opt for a brand-new hard drive.
Solution 6: Using DiskPart
If the partition tables of the disk are corrupt at times then this error might be encountered by its users. To trouble shoot this issue abide to the following steps.
Step 1: Identify the “System” partition while all the partitions are listed by the setup lists and note its name.
Step 2: Press “Shift” + “F10” and then type in “Diskpart”.
Step 3: Here, type “List disk” to list all the partitions.
Step 4: There type “Select Disk (The number of the partition, if it was 1 then you would type Select Disk 1)“.
Step 4: Now type “Clean” in the dialogue box and press “Enter”.
Read Also:
- KB4023057
- WMI Provider Host
- Windows Has Stopped This Device Because It Has Reported Problems. (Code 43)


